Fundamentals for Better WordPress Website Performance

I think you’ll agree with me when I say that: Speeding up your website is not always easy. Or is it?
From my experience, it’s possible to solve the majority of page speed issues in 7 steps that are easy to follow and execute. Even for non-technical folks. No need to hire a developer.
Here’s my tutorial about the fundamentals for a better WordPress website performance.
Table of content
Enable PHP 7.4 on your web server
Easy to follow for non-technical people? That’s right!
You don’t have to understand or even know what PHP is.
You only need to know that enabling PHP 7 on your server could dramatically accelerate WordPress.
In short, WordPress is a PHP software and the version 7 is INCREDIBLY faster than the previous version.
So it’s worth taking 2 minutes to activate it.
PHP’s version 7 is now officially recommended by WordPress.
So it’s very likely that your current web host offers it.
And if it’s not the case?
Change your web hosting!
If your web host does not offer PHP 7, it is also likely that it does not offer the latest speed technology and, therefore, that you are paying for a mediocre product. If you’re looking for a new server, here’s a great guide for finding the best WordPress hosting.
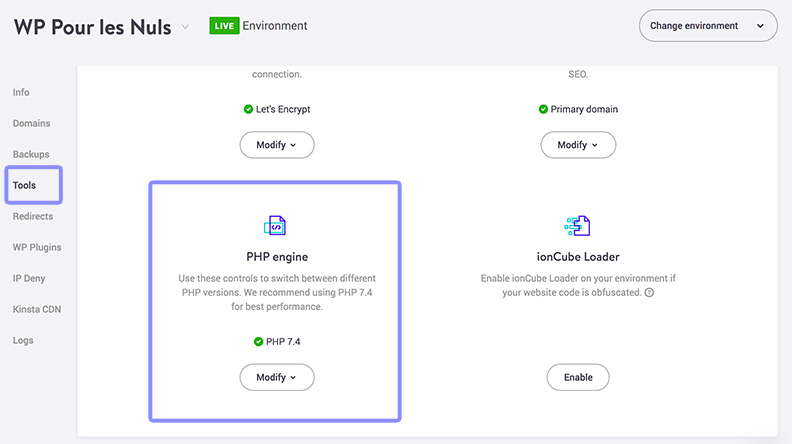
How to Enable PHP 7 or other most recent versions
Here is how I change the version of PHP on my web host Kinsta.

Test your site to make sure everything is working properly.
Some plugins or WordPress themes might not be compatible. If this is the case, it may be beneficial to locate the faulty plugin and deactivate it or find an alternative.
Enable Server Cache
Now that WordPress is powered by PHP 7, you need to enable a server cache.
Some hosts, like Kinsta, WP Engine or SiteGround enable it natively for you. Others like EX2 offers it natively, but you need to enable it. It’s pretty simple.
How to Enable Server Cache
Do you have special needs?
Do you need more configurations?
For more complete requirements, I suggest the WP Rocket plugin.
This plugin is a paid one, but in my opinion, it is the best in the ALL-IN-ONE category.
Further reading:
- Improve Server Response Time — on Google Developer
- Server Response Time — on Varvy
- How to Improve Server Response Time — on KeyCDN
Enable Browser Cache
The browser cache is useful for caching static resources such as images on the user’s side.
If not enabled, the user will have to download the same images again and again on every page view.
Which is not very efficient!
How to Enable Browser Cache
Most ALL-IN-ONE plugins enable this cache.
If this is not the case, I suggest Speed Up — Browser Caching.
Another FREE and SIMPLE plugin to set up.
How to Check Browser Cache
How do I check if the browser cache is enabled?
It’s simple: Go to Google PageSpeed Insights and scan your site.

You have a browser cache issue:
- If PageSpeed Insights displays the “Leverage Browser Caching” error and
- If the files are coming from your site.
What if the error is displayed but the files are external to your site?
Unfortunately, you can’t control files on another server.
Further reading:
- Leverage Browser Caching — on Google Developer
- Leverage Browser Caching — on Varvy
- Pagespeed: Leverage Browser Caching — on Gtmetrix
Enable Gzip Compression
Gzip or, even better, Broti compression are compression algorithms used to reduce the weight of your site’s resources.
Every resource can be compressed up to 90%!
This can greatly speed up your site.
How to Enable Compression
Compression is as easy to configure as the browser cache.
In fact, compression is usually already enabled if you are using an ALL-IN-ONE cache plugin or Speed Up-Browser Caching.
How to Check Compression
How do I check if Gzip compression is enabled?
As with the browser cache, go to Google PageSpeed Insights and scan your site.

You have a compression problem:
- If PageSpeed Insights displays the “Enable compression” error and
- If the files are coming from your site.
What if the error is displayed but the files are external to your site?
Well, again, as with the browser cache, you can’t control files located on another server.
Further reading:
- Enable Compression — on Google Developer
- Enable Gzip Compression — on Varvy
- Server Configs — on h5bp Github repo
Optimize your Images
It’s a safe bet that the majority of your page’s size can be attributed to images.
There are several image optimization services and plugins out there.
You are free to choose the one you like.
However, my choice stops on Compressing JPEG and PNG images.
This plugin allows you to optimize up to 500 images per month!
This is good enough for the most of us.
Creating an account is required for use of the plugin. Fortunately, unlike many competitors, you don’t need credit card information.
You only need to pay if you want to compress over 500 images a month.
If you reach the limit, you’ll get an email notification.
Don’t forget to activate your account by email.

That’s all!
Further reading:
- Essential Image Optimization — by Addy Osmani
- Optimize Images — on Google Developer
- Image Optimization — on Google Web Fundamentals
Enable HTTP/2
HTTP what?
As with the PHP version, you don’t have to understand what HTTP/2 is.
Just be aware that enabling HTTP/2 will speed up your site.
And you can do this without having to modify your site.
There’s only one catch!
To take advantage of the benefits of the HTTP/2 protocol, your site must be secure. Which means, it must be over HTTPS.
Fortunately, installing a security certificate has recently become much easier in big part thanks to the Let’s Encrypt project, which allows you to install a TLS certificate for free.
And Let’s Encrypt is now installed on many web hosting services.
How to Detect HTTP/2
I like to use the Chrome extension HTTP/2 and SPDY indicator for this.
The extension adds a small flash that turns blue if the site visited is powered by HTTP/2.

How to Enable HTTP/2
It is quite simple to do.
Your server is either compatible or not.
I suggest that you contact your web hosting provider if you’re not sure.
And if it’s not the case?
Change your web hosting!
Enable Cloudflare
I can’t hide it: I’m a big fan of Cloudflare.
Normally, it is not recommended to activate a CDN if your visitors are mostly local.
But Cloudflare is not a regular CDN.
It has more than 115 servers on the planet. Twice as much as MaxCDN and four times more than KeyCDN.
So it’s likely that one of these servers is near you.
Anyway…
Do you know of a FREE DNS manager that is one of the fastest in the world?
Or even just a free CDN?
Here’s the deal: For me, Cloudflare is a control panel for my site’s performance. It’s a tool that I install by default on all sites, because there is nothing comparable to it.
How to Enable Cloudflare
The first time I activated Cloudflare, I remember thinking: It’s magic!
As mentioned earlier, Cloudflare is different from a traditional CDN.
To enable it, you only need to change your DNS.
If you are on a mediocre server and you still don’t want to switch, it’s still possible to fix several performance recommendations without having to change it, thanks to Cloudflare who acts as a proxy.
Here are what Cloudflare can fix for you:
- HTTP/2: Cloudflare can enable HTTP/2 even if your server does not support it.
- Gzip Compression: It can activate the compression of your site’s files automatically.
- Security Certificate: It can activate a security certificate if it is not possible to do so on your server.
- Images Optimization (Paid Plan): It can optimize your images automatically and even compress and resize them for mobile.
One Last Thing About Cloudflare, I created a how-to guide about Cloudflare and WordPress and also a post about how to setup Cloudflare to cache a WordPress pages. Hope those posts will be helpful for you!
Conclusion
Though caching your WordPress pages on Cloudflare is not a piece of cake, it’s definitely worth the effort for speeding up your websites. Feel free to ask your questions or share your opinions in the comments bellow!
